

eLearning is, of course, an abundant tool to provide self-guided learning to people all over the world. It can range from simple text-based content up to immersive 3D simulation, but the sweet spot, the thing that will likely get you the biggest impact for the most efficient effort, is to create compelling visual learning that engages the learner but doesn’t take forever to make.
And, believe it or not, PowerPoint could well be the answer. Hear me out.
The most common eLearning authoring platforms are probably Articulate Storyline and Adobe Captivate, and both are excellent. But PowerPoint gives you far great control over the visual storytelling component of your eLearning, while at the same time, allowing you to create the content faster. The downside is slightly less interactivity, no tracking, and no HTML5 output, but I’ll come onto that.
Compelling visual storytelling with PowerPoint
There’s plenty out there on how to create effective visual training content so I want to show you how to develop it using PowerPoint.
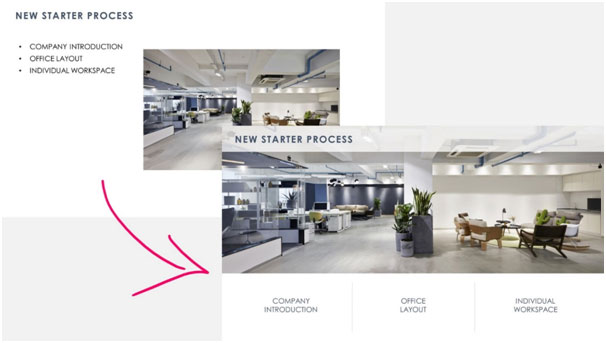
The first thing to consider is the layout. Clear layout will make it far easier for your audience to find and see the content you’re showing. Developing a grid is a great start, and the classic is a 3×3 grid – the rule of thirds – where you split your slide into three rows and three columns. Ensuring that all of your content lines up in a grid means that each slide is well composed, and that you’re consistent across the entire course. It looks far more professional, but also makes it quicker and easier to spot content, so more time is spent thinking about what it means.
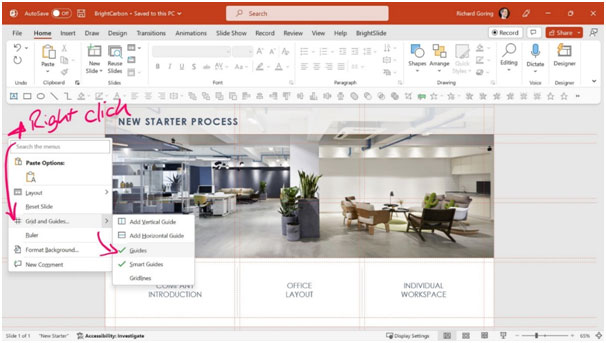
 You can create a custom grid using the free BrightSlide add-in for PowerPoint, but also by right-clicking on a blank part of the slide, choosing Grid and Guides, and then click on ‘Guides’ in the sub-menu. You can then add as many horizontal or vertical guides as you like, moving them around the slide, and then your content will snap to those guides across all slides in the deck.
 Focused visual attention
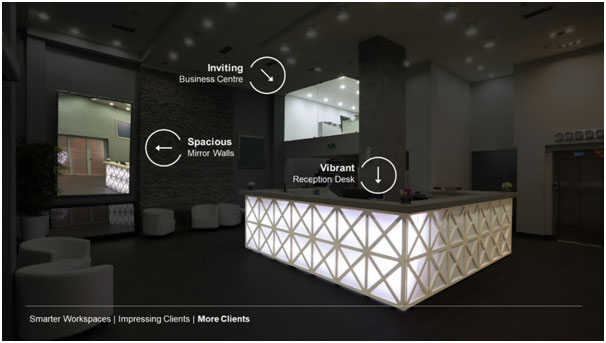
Many eLearning courses require a lot of detailed content, but it’s hard for learners to take on a lot of new information all at once. Pacing the flow of information using builds – either through simple fade animations or split over several slides – is a great way to help, but that’s not always possible. In which case, custom highlighting is a great tool to focus attention on the things that matter most.
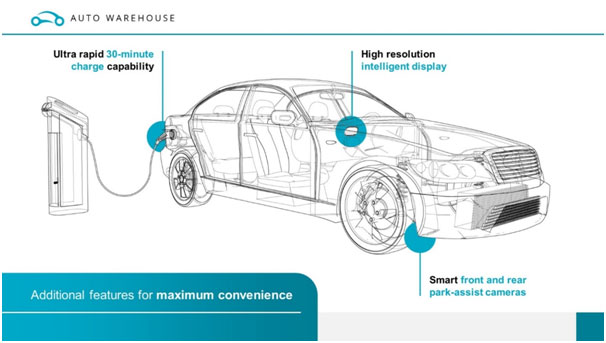 The simplest form of highlight is to use a semi-transparent box to blank out everything you don’t want, leaving the key content to be at the forefront of the visual field. You could achieve this very simply with a few boxes covering things up, but let me share a more complex example, using two techniques.
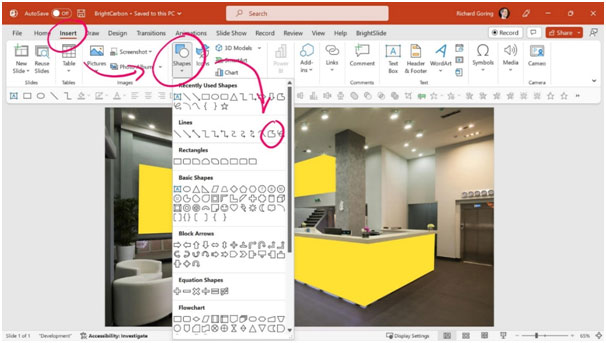
First, use the freeform tool (Insert > Shapes > Lines > Freeform (looks like a wave)) and use it to trace around the key components that you want to highlight. You need to click, then let go of the mouse button and move the cursor to the next point in the shape you want to create – if you hold down the mouse button you’ll get a messy line. Do this for as many custom highlights as you need.
 Draw a rectangle that’s going to cover the entire slide and use the arrange tools (Home > Arrange > Send Backwards) to send it backward through the layers, so you can see the shapes you’ve drawn again. Now you’re going to cut out the shapes from the box to create the highlight using Merge Shapes (Shape Format > Merge Shapes > Subtract). You’ll cut out the freeform shapes from the large rectangle, leaving only the important parts of the content.
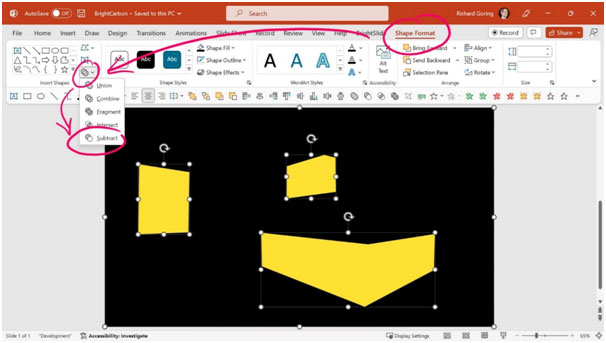 Once you’ve got the mask, make it semi-transparent (right-click > Format Shape > Fill > Transparency) and add a 20%-30% transparency, so that you can see where the elements fit into the wider picture for better context. Then simply apply additional labels, and you’re done. A really simple, but powerful technique.
 Interactive eLearning in PowerPoint
Clearly Storyline and Captivate offer great solutions for interactivity, but if you can’t use those tools, then PowerPoint’s trigger animation, hyperlink, and Zoom navigation functionalities do a pretty good job of quickly creating interactive content, albeit simpler than in a dedicated eLearning tool, so they are worth checking out to see how you can use them in your courses.
Tracking and HTML5 conversion
Once you have an interactive, visual PowerPoint, you need users to get to it, which generally means a SCORM-compliant HTML5 file, and here, PowerPoint lets you down. But, when we’re developing eLearning content in PowerPoint, we’ll use a different tool, right at the end. If we’ve used PowerPoint for the dynamic visuals, then we’ll convert those slides to short videos (File > Export > Create a Video) and that gives you an mp4 video file that you can then add into a Storyline or Captivate project, and layer any interactivity over the top. It’s generally the quickest and easiest way to maximize both the visual storytelling and interactivity of your eLearning.
Or, if it’s all done in PowerPoint, then you can convert the PowerPoint file to HTML5 using a tool like iSpring, that not only incorporates all of PowerPoint’s animations, but also the interactivity you’ve included too. You then export to a SCORM-compliant HTML5 package that you can add straight to your LMS.
Next Steps
I’d encourage you to give it a go, and remember, it doesn’t need to take long. You’ll also improve the quality of your presentations at the same time, by applying these ideas. And for more inspiration, look at how other articles at Enterprise Viewpoint structure their stories and the kinds of visuals they use. Find more experts in communities like the Presentation Guild and the Learning Guild. And find loads of free, practical guides at BrightCarbon. Just remember to always think about what your audience needs.